Timeplus BYOC User Guide
Introduction
The Timeplus BYOC (Bring Your Own Cloud) CLI tool enables you to deploy and manage Timeplus Enterprise on your AWS infrastructure. This guide walks you through installation, configuration, and daily operations.
Deployment Architecture
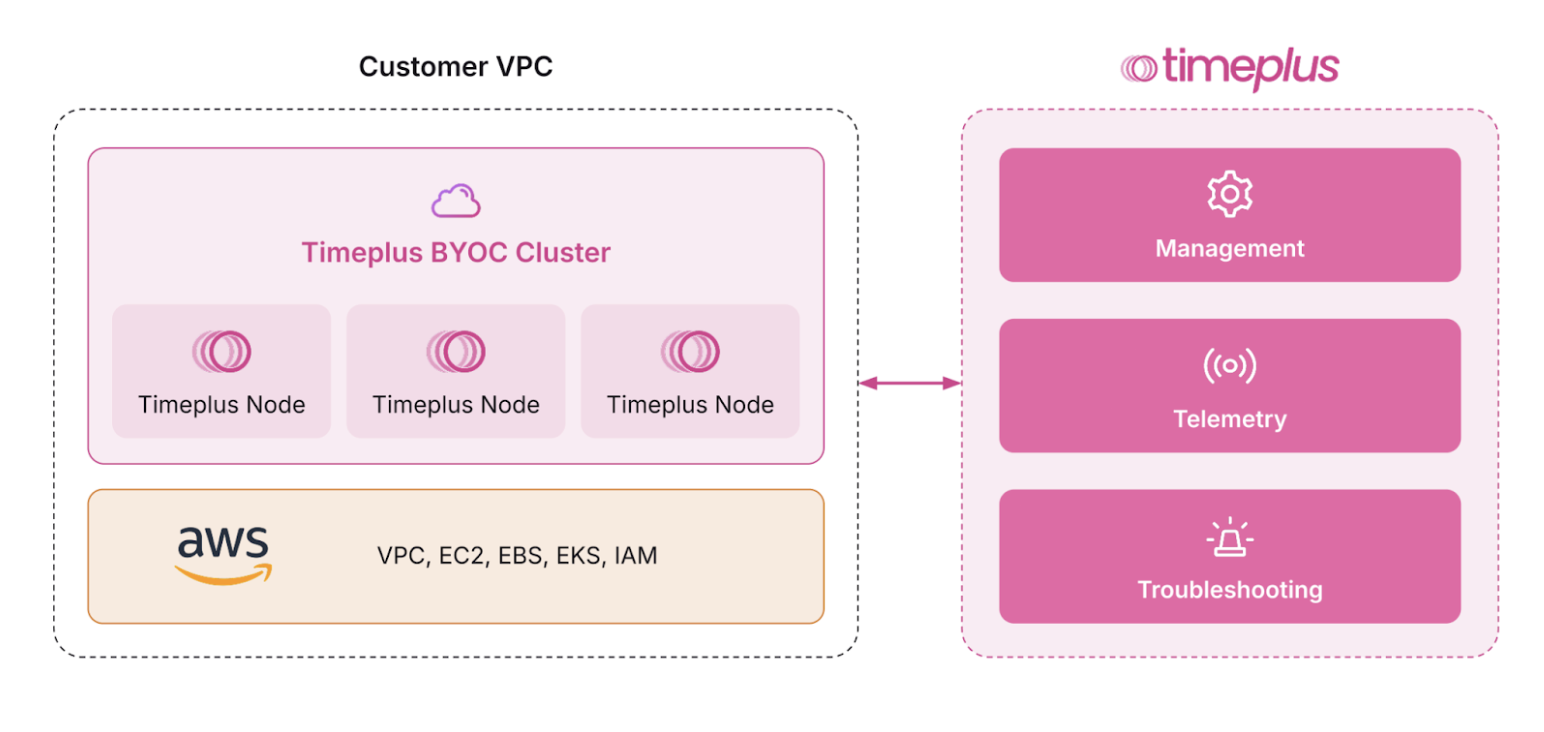
The Timeplus BYOC (Bring Your Own Cloud) architecture enables customers to run Timeplus workloads entirely within their own AWS infrastructure for complete data sovereignty and security. The deployment consists of a Timeplus BYOC Cluster containing multiple Timeplus Nodes that operate within the customer's VPC, leveraging AWS services including EC2 for compute, EBS for storage, EKS for Kubernetes orchestration, and IAM for access management. All data processing and storage remain within the customer's cloud environment, ensuring that sensitive data never leaves their infrastructure boundaries. The planned control path connection to Timeplus-managed services for Management, Telemetry, and Troubleshooting capabilities, which is currently on the roadmap and under implementation to provide additional operational support while maintaining the data isolation that the BYOC model provides.
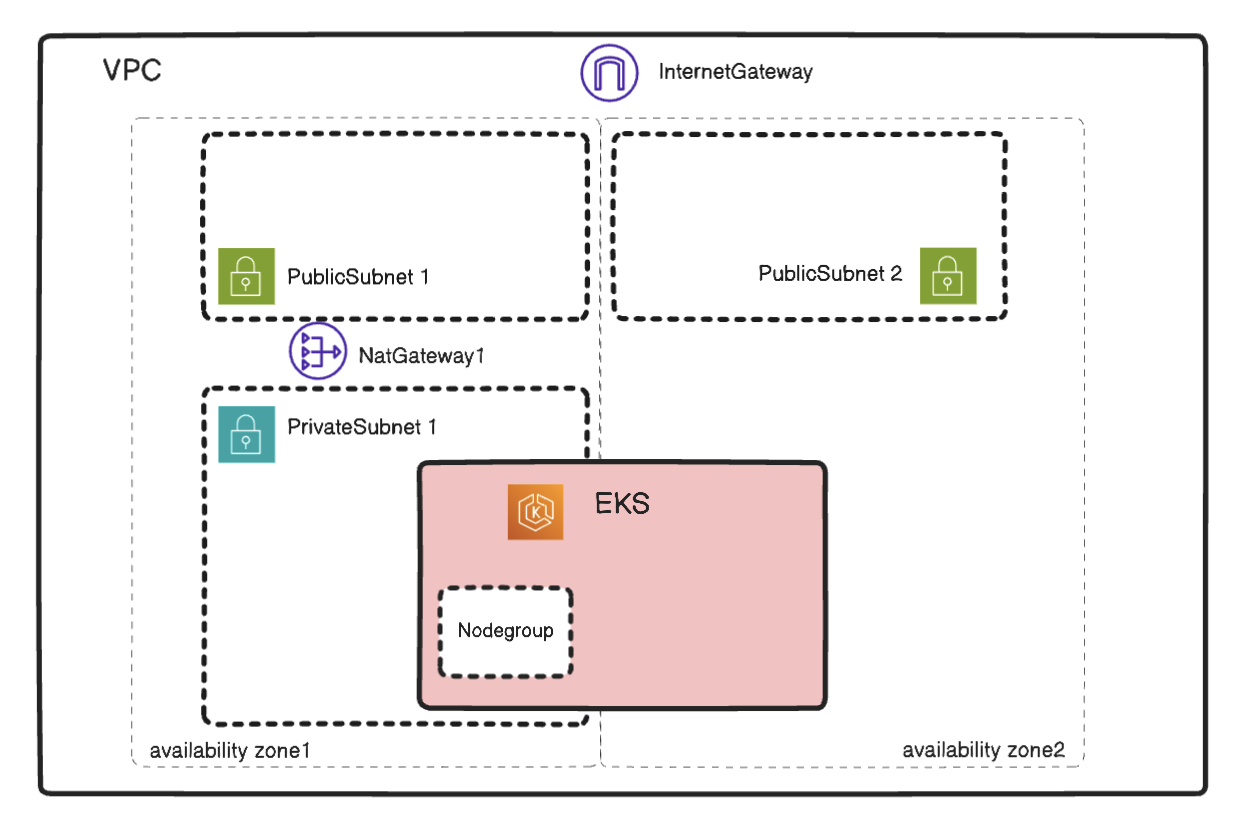
By default, a duo-availability zone EKS cluster will be created as follows: the EKS Nodegroup resides in a single AZ to reduce cross-AZ network costs, while the EKS control plane remains distributed across both AZs.
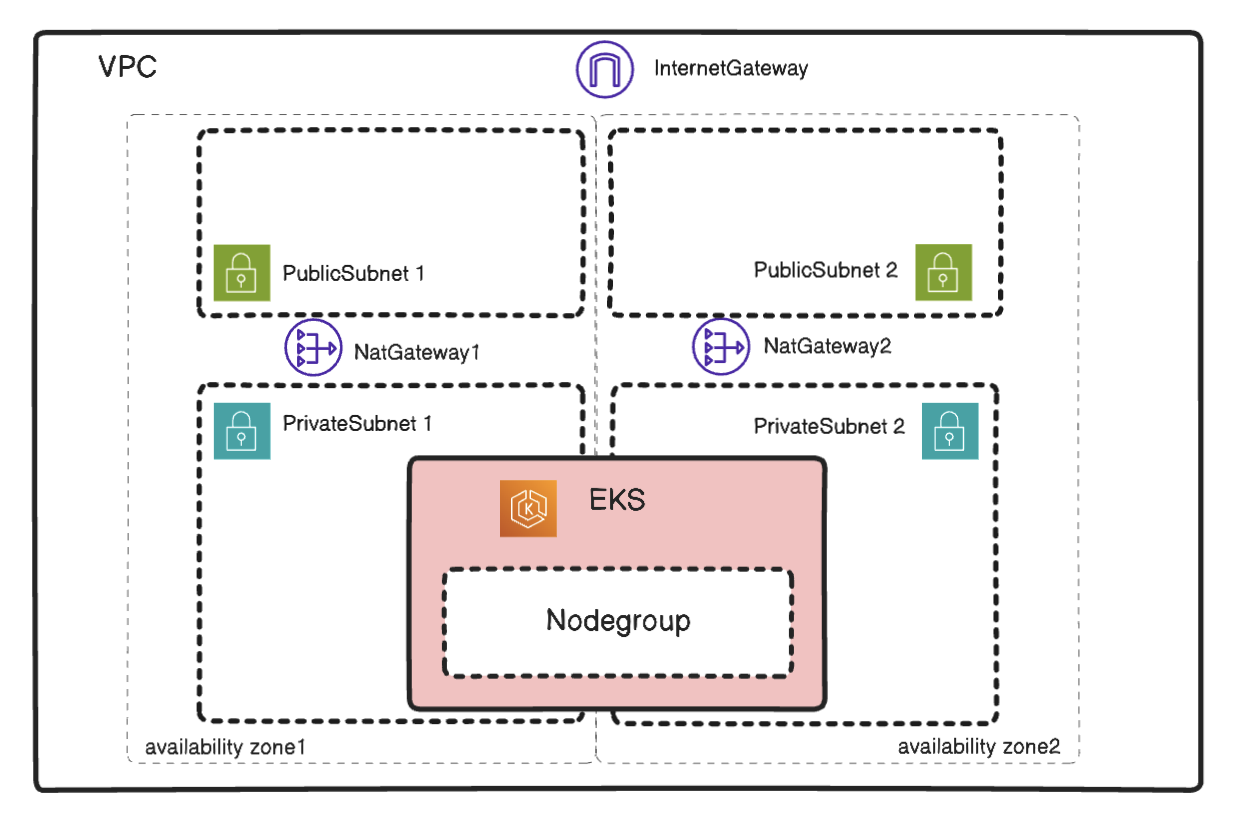
Alternatively, users can enable two AZ for nodegroup.
Pricing Model and License Management
User has two options of pricing model:
- Bring your own license (BYOL)
- AWS usage based
AWS Usage Based
When pricingModel is configured as aws_usage_based, Timeplus BYOC deployment will call AWS Marketplace metering API to report usage every hour. The MPU metrics is defined as the total number of cores deployed for Timeplus at the collect time.
Use helm version 10.0.8 or higher is required.
MPU Sizing Guide
MPU (micro processing unit) is the Timeplus usage unit for usage based pricing. Related EC2 instance type will be used for EKS nodes according to the minial MPU size.
| MPU Size | CPU Cores | Memory | Recommended For |
|---|---|---|---|
| 4 MPU | 4 | 16 GB | Development, testing, small workloads |
| 8 MPU | 8 | 32 GB | Production, small workloads |
| 16 MPU | 16 | 64 GB | Production, normal workloads |
| 32 MPU | 32 | 128 GB | Production, large workloads |
Bring your own license (BYOL)
When pricingModel is configured as byol, use can install Timeplus Enterprice by own license. Refer to this doc for how to manage license.
Prerequisites
Required Tools
Before using the Timeplus BYOC provisioner cli, ensure you have:
- aws-cli 2.27.7 or higher
- kubectl v1.28 or higher
- helm v3.12 or higher
AWS Account Setup
1. AWS Credentials
Configure AWS credentials using environment, configuration file, assume role or refer to https://docs.aws.amazon.com/sdkref/latest/guide/settings-reference.html
2. Required IAM Permissions
Your AWS user/role needs these permissions:
- CloudFormation: Full access to create/update/delete stacks
- EKS: Full access to manage clusters
- EC2: Access to VPC, subnets, security groups, and instances
- IAM: Create and manage roles for EKS
- EBS: Manage volumes through CSI driver
Example IAM policy:
{
  "Version": "2012-10-17",
  "Statement": [
    {
      "Effect": "Allow",
      "Action": [
        "ec2:*",
        "eks:*",
        "iam:*",
        "cloudformation:*",
        "autoscaling:*",
        "elasticloadbalancing:*",
        "sts:GetCallerIdentity"
      ],
      "Resource": "*"
    }
  ]
}
3. AWS Service Limits
Verify your account has adequate limits:
- VPCs: At least 1 available
- Elastic IPs: At least 2 available
- EC2 instances: Sufficient for your chosen instance type (minimal 4 nodes will be provisioned)
- EBS volumes: Adequate for storage requirements
Refer to the following document about AWS Service Limits:
- https://docs.aws.amazon.com/awssupport/latest/user/service-limits.html
- https://docs.aws.amazon.com/general/latest/gr/aws_service_limits.html
- https://docs.aws.amazon.com/servicequotas/latest/userguide/intro.html
Quick Start
the BYOC cli timeplus_byoc can be found in the Timeplus enterprise release package (refer to Deploy on Bare Metal ) under timeplus/bin directory.
Step 1: Initialize Configuration
Run the interactive configuration wizard, which will help generate configuration file of the cluster to be deployed.
timeplus_byoc init
Follow the interactive prompt and provide related configurations.
Here is a list of all supported regions:
- us-east-1
- us-east-2
- us-west-1
- us-west-2
- eu-west-1
- eu-central-1
- ap-southeast-1
- ap-northeast-1
Step 2: Review Generated Configuration
After initialization, a directory is created: timeplus-stack-{cluster-name}/
cd timeplus-stack-{cluster-name}/
ls -la
Contents:
cluster.yaml- Main configuration fileeks-stack.yaml- CloudFormation template for EKSstorageclass-aws.yaml- Kubernetes storage class definition
Users can change the configuration before running the byoc cli.
Step 3: Deploy Timeplus
timeplus_byoc --config timeplus-stack-{cluster-name}/cluster.yaml
# or use configuration directory
timeplus_byoc --config timeplus-stack-{cluster-name}
Deployment Process (20-45 minutes):
- Infrastructure Creation: CloudFormation creates VPC, subnets, NAT gateways, EKS cluster, and node group
- Cluster Configuration: Kubectl is configured to access the cluster
- Node Readiness: Waits for all nodes to be ready
- Storage Setup: Creates storage class and namespace
- Autoscaler Deployment: Installs EKS cluster autoscaler
- Timeplus Installation: Deploys Timeplus via Helm chart
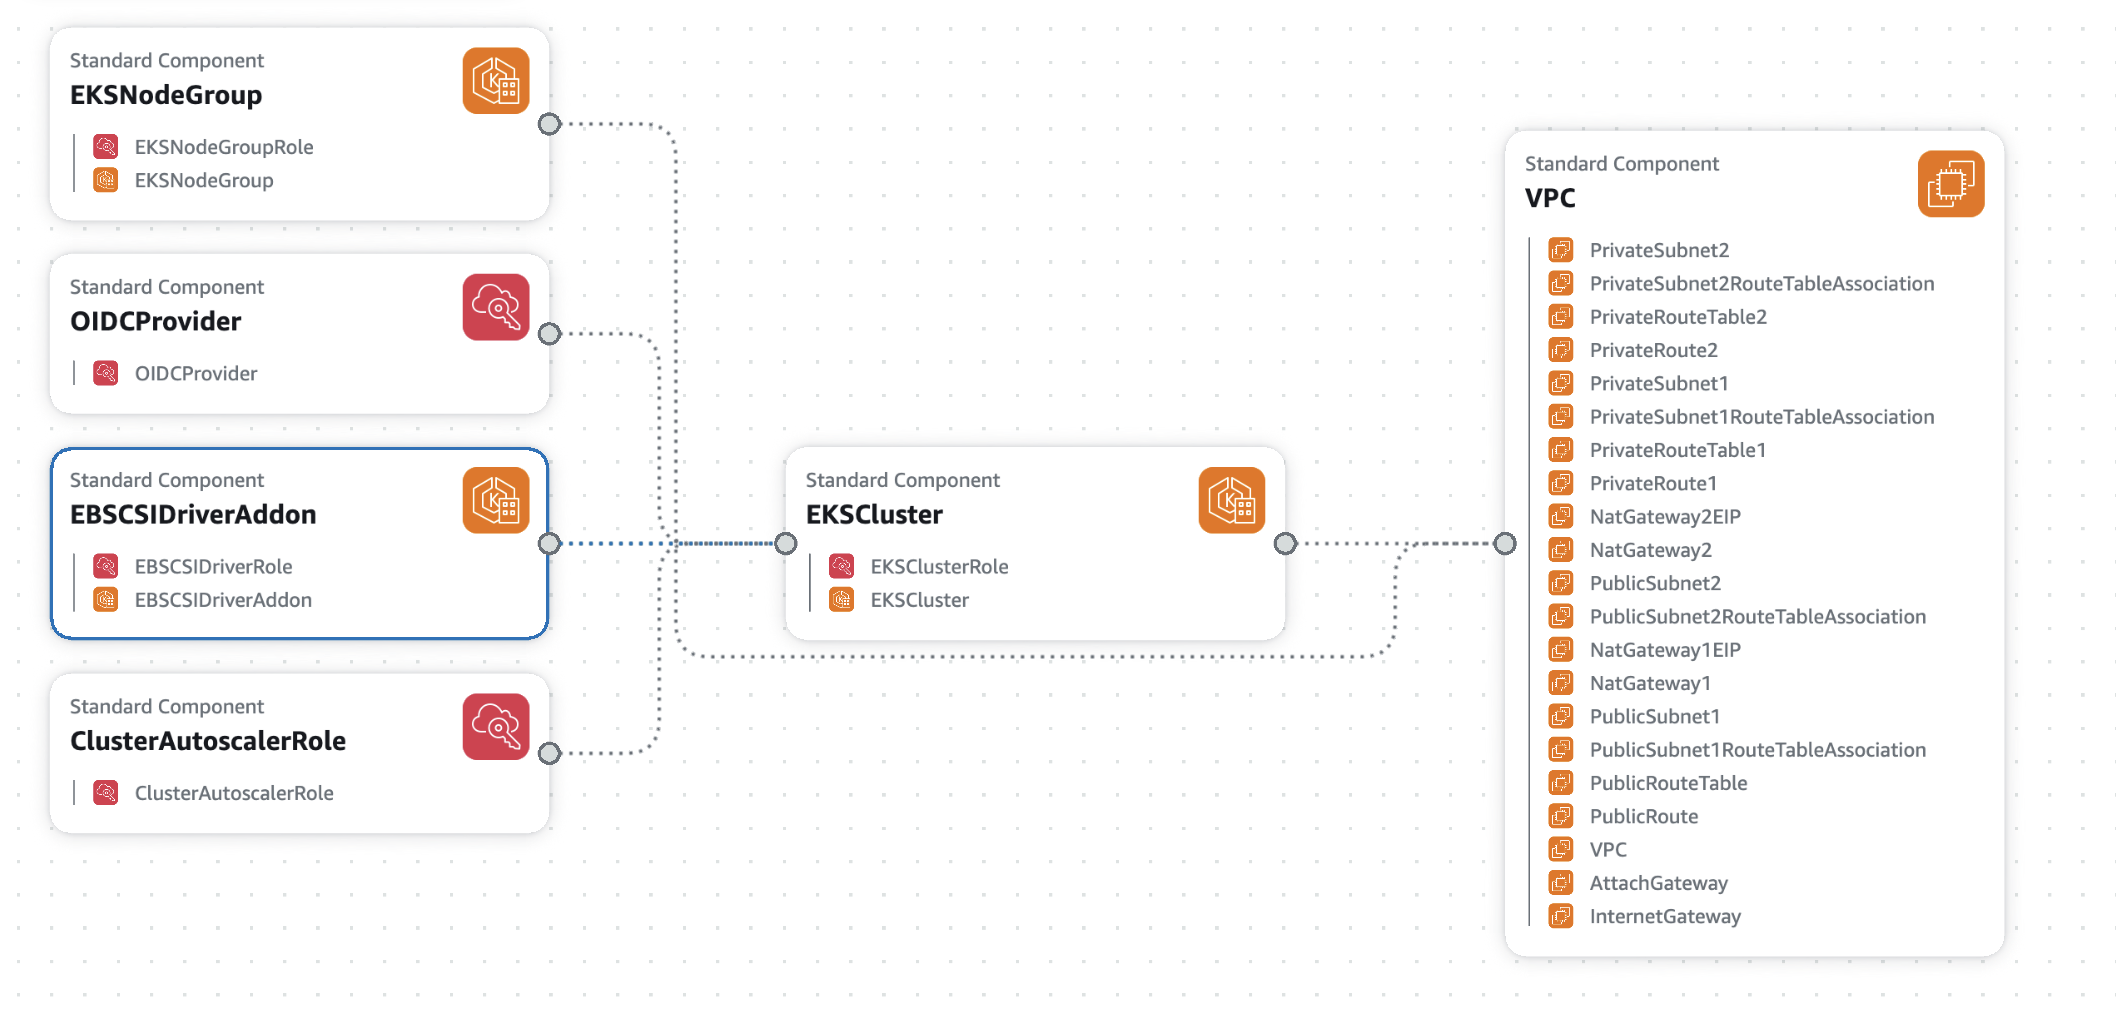
The following AWS resources will be created
| Category | Resource Type | Resource Name/ID | Key Details |
|---|---|---|---|
| Networking | VPC | {ClusterName}-vpc | CIDR: 10.0.0.0/16 |
| Internet Gateway | {ClusterName}-igw | Attached to VPC | |
| NAT Gateway | {ClusterName}-nat-1 | For private subnet 1 | |
| NAT Gateway | {ClusterName}-nat-2 | For private subnet 2 (Multi AZ Case) | |
| Elastic IP | {ClusterName}-eip-1 | For NAT Gateway 1 | |
| Elastic IP | {ClusterName}-eip-2 | For NAT Gateway 2 (Multi AZ Case) | |
| Public Subnet | {ClusterName}-public-1 | 10.0.1.0/24, AZ 1 | |
| Public Subnet | {ClusterName}-public-2 | 10.0.2.0/24, AZ 2 | |
| Private Subnet | {ClusterName}-private-1 | 10.0.10.0/24, AZ 1 | |
| Private Subnet | {ClusterName}-private-2 | 10.0.20.0/24, AZ 2 (Multi AZ Case) | |
| Route Table | {ClusterName}-public-rt | Routes to IGW | |
| Route Table | {ClusterName}-private-rt-1 | Routes to NAT Gateway 1 | |
| Route Table | {ClusterName}-private-rt-2 | Routes to NAT Gateway 2 (Multi AZ Case) | |
| Route | PublicRoute | 0.0.0.0/0 → IGW | |
| Route | PrivateRoute1 | 0.0.0.0/0 → NAT Gateway 1 | |
| Route | PrivateRoute2 | 0.0.0.0/0 → NAT Gateway 2 | |
| Route Table Association | PublicSubnet1RouteTableAssociation | Public Subnet 1 → Public RT | |
| Route Table Association | PublicSubnet2RouteTableAssociation | Public Subnet 2 → Public RT (Multi AZ Case) | |
| Route Table Association | PrivateSubnet1RouteTableAssociation | Private Subnet 1 → Private RT 1 | |
| Route Table Association | PrivateSubnet2RouteTableAssociation | Private Subnet 2 → Private RT 2 (Multi AZ Case) | |
| VPC Gateway Attachment | AttachGateway | VPC ↔ IGW | |
| IAM | OIDC Provider | OIDCProvider | For EKS service accounts |
| IAM Role | {ClusterName}-cluster-role | EKS cluster management | |
| IAM Role | {ClusterName}-nodegroup-role | EC2 worker nodes | |
| IAM Role | {ClusterName}-ebs-csi-driver-role | EBS volume management | |
| IAM Role | {ClusterName}-cluster-autoscaler-role | Auto-scaling management | |
| EKS | EKS Cluster | {ClusterName} | Version 1.33, all logging enabled |
| EKS Node Group | {ClusterName}-nodes | 4-10 nodes | |
| EKS Add-on | aws-ebs-csi-driver | Persistent volume support |
Step 4: Access Timeplus
The kubectl configuration file will be generated at ~/.kube/config-{cluster-name}
Run the following command to configure the default k8s cluster to use or add args --kubeconfig to set which cluster to access:
export KUBECONFIG=~/.kube/config-{cluster-name}
Option A: Port Forward (Recommended for testing and development )
kubectl port-forward -n timeplus svc/timeplus-appserver 8000:8000
Access at: http://localhost:8000
Option B: Expose via Load Balancer
timeplus_byoc --config timeplus-stack-{cluster-name} --expose
This creates an AWS Elastic Load Balancer. To get the ELB URL will be printed and the user can get the url by status sub-command.
timeplus_byoc status --config timeplus-stack-{cluster-name}
Look for appserver_info in the output.
Common Operations
Check Deployment Status
timeplus_byoc status --config timeplus-stack-{cluster-name}
Output includes:
- Stack status and creation time
- Cluster information (name, version, endpoint)
- Node configuration
- AppServer access URL (if exposed)
Example output:
{
  "stack_name": "{cluster-name}-stack",
  "status": "CREATE_COMPLETE",
  "created_time": "2025-01-15T14:23:45Z",
  "cluster_info": {
    "cluster_name": "{cluster-name}",
    "status": "ACTIVE",
    "endpoint": "https://xxx.eks.amazonaws.com",
    "version": "1.32"
  },
  "appserver_info": "http://xxx.elb.amazonaws.com:8000"
}
View Kubernetes Resources
# Set KUBECONFIG
export KUBECONFIG=~/.kube/config-{cluster-name}

# View pods
kubectl get pods -n timeplus

# View services
kubectl get svc -n timeplus

# View persistent volumes
kubectl get pvc -n timeplus

# View logs
kubectl logs -n timeplus deployment/timeplus-appserver --tail=100
Advanced Usage
Using Local Helm Charts
If you want to use a custom or local Helm chart:
# During initialization, specify path when prompted:
Use Local Helm Chart Path: /path/to/local/helm/chart

# Or edit cluster.yaml:
helmChartPath: /path/to/local/helm/chart
Custom Helm Values
Create a custom values file:
# custom-values.yaml
timeplusd:
  replicas: 5
  resources:
    limits:
      cpu: "8"
      memory: "32Gi"
Update cluster.yaml:
customerHelmValuesFile: /path/to/custom-values.yaml
Redeploy:
timeplus_byoc --config timeplus-stack-{cluster-name}
Scale Timeplus
Run the following command to scale the Timeplus cluster.
timeplus_byoc scale --config timeplus-stack-{cluster-name} --compute computeNodeReplica --data DataNodeReplica
Or user can scale the compute nodes by manually updating the number of replicas in the cluster.yaml config
Update the Helm chart version:
# cluster.yaml
applicationHelmValues:
  timeplusd:
    computeNode:
      replicas: 3 #add more replicas for compute nodes
Redeploy:
timeplus_byoc --config timeplus-stack-{cluster-name}
Upgrading Timeplus
Run the following command to upgrade the Timeplus.
timeplus_byoc upgrade --config timeplus-stack-{cluster-name} --helm-version helmChartVersion --timeplusd-version timeplusdVersion
Users can choose to upgrade only using the Helm version, Timeplusd version or change both.
Update the Helm chart version manually in the cluster config and then redeploy is also supported:
# cluster.yaml
helmChartVersion: 8.1.0  # New version
Or update the timeplusd tag, if user only want to upgrade specific timeplusd version:
# cluster.yaml
applicationHelmValues:
    timeplusd:
        tag: 3.0.1 # the timeplusd version to be upgrade/downgrade to
Redeploy:
timeplus_byoc --config timeplus-stack-{cluster-name}
Scale EKS Nodes
By default, a 4 nodes EKS cluster will be created, use can update related configuration in cluster.yaml to change this.
minNodes: 4
maxNodes: 10
desiredNodes: 4
As EKS cluster autoscaler is installed, the node will be automatically provisioned when the workloads increases and exceeds the current capability. User can set the maxNodes to have an upper limits of how many nodes can be automatically provisioned.
Deploy on existing Subnet
User can manually update the eks-stack.yaml to depend on existing subnet to create the EKS on existing subnet.
Replace following default values with acutally Subnet information:
- VpcId
- PublicSubnet1Id
- PublicSubnet2Id
- PrivateSubnet1Id
Cleanup and Deletion
Delete Entire Deployment
WARNING: This will delete all resources and data permanently.
timeplus_byoc cleanup --config timeplus-stack-{cluster-name}
You'll be prompted for confirmation:
CLEANUP WARNING
This will DELETE the CloudFormation stack and ALL resources:
- EKS cluster: my-timeplus-cluster
- VPC and networking components
- IAM roles
- Timeplus deployments
- All data will be LOST

Type 'DELETE my-timeplus-cluster' to confirm:
Type the confirmation string exactly to proceed.
Force Cleanup (Skip Confirmation)
timeplus_byoc cleanup --force --config timeplus-stack-{cluster-name}
Use with extreme caution in automation scripts.
Cleanup Process
The cleanup happens in this order:
- Delete Timeplus AppServer ELB (if exposed)
- Wait for AWS ELB resources to be removed
- Uninstall Timeplus Helm release
- Delete persistent volume claims
- Delete Timeplus namespace
- Delete CloudFormation stack
- Delete VPC, subnets, NAT gateways, and other resources
This process takes 15-45 minutes.
Configuration Reference
cluster.yaml Structure
# Cluster identification
clusterName: {cluster-name}

# AWS region
region: us-east-1

# Pricing Model
pricingModel: byol # support aws_usage_based or byol

# Helm chart version
helmChartVersion: 10.0.7

# Node configuration
nodeInstanceType: m5.xlarge
minNodes: 4
maxNodes: 10
desiredNodes: 4

# Generated file paths
templateConfigPath:
  timeplus-stack-{cluster-name}/timeplus_byoc-eks-stack.yaml
storageClassConfigPath:
  timeplus-stack-{cluster-name}/timeplus_byoc-storageclass-aws.yaml

# Timeplus configuration
applicationHelmValues:
  timeplusConnector:
    affinity:
      podAffinity:
        requiredDuringSchedulingIgnoredDuringExecution:
          - labelSelector:
            matchLabels:
              app.kubernetes.io/component: timeplus-appserver
              app.kubernetes.io/instance: timeplus
              app.kubernetes.io/name: timeplus-enterprise
            topologyKey: kubernetes.io/hostname
  timeplusd:
    replicas: 3
    resources:
      limits:
        cpu: "4"
        memory: "16Gi"
      requests:
        cpu: "3"
        memory: "14Gi"
    storage:
      stream:
        size: "100Gi"
        selector: false
      history:
        size: "100Gi"
        selector: false
      log:
        enabled: true
        size: "10Gi"
        selector: false
    defaultAdminPassword: "timeplusd@t+"

# Optional: Local Helm chart
helmChartPath: ""

# Optional: Custom Helm values file
customerHelmValuesFile: ""
Best Practices
Naming Conventions
- Use descriptive cluster names:
prod-timeplus-us-east,dev-timeplus-team1 - Avoid special characters except hyphens
- Keep names under 40 characters
Configuration Management
- Store configurations in a dedicated directory
- Use separate configurations for different environments
Security
- Change default passwords before deployment
- Restrict network access using security groups
- Enable AWS CloudTrail for audit logging
- Regularly update to latest Timeplus versions
- Use IAM roles instead of access keys when possible
Monitoring and Health Check
# Monitor cluster health
kubectl get nodes
kubectl top nodes

# Monitor Timeplus pods
kubectl get pods -n timeplus -w
kubectl top pods -n timeplus

# View recent events from EKS Kubernetes cluster
kubectl get events -n timeplus --sort-by='.lastTimestamp'
Manage Data
Data Encryption
By default, the EBS encryption is off, user can turn on it before deployment
apiVersion: storage.k8s.io/v1
kind: StorageClass
metadata:
  name: timeplus-storage-class
provisioner: ebs.csi.aws.com
parameters:
  fsType: ext4
  type: gp3
  iops: "3000"
  throughput: "125"
  encrypted: "true"       # ✅ Turn on encryption
  kmsKeyId: "arn:aws:kms:us-west-2:123456789012:key/abcd-1234..."  # (optional)
volumeBindingMode: WaitForFirstConsumer
allowVolumeExpansion: true
reclaimPolicy: Delete
Data Backup and Restore
Users can use AWS EBS backup mechanism to backup/restore the persistent vol of EKS cluster. Refer to the following AWS document.
- EKS Best Practices — Storage The AWS EKS Best Practices guide mentions using Velero (open source) for backing up EBS-backed PVs.
- Use Kubernetes volume snapshots with EBS CSI AWS’s EKS documentation for the EBS CSI driver covers how to enable snapshot capability in EKS using VolumeSnapshotClass / CSI snapshot controller
- AWS Blog: Using EBS snapshots for persistent storage with EKS Describes using CSI snapshot features to capture point-in-time copies of EBS volumes.